Development Environment
Overview
Here is a brief overview of the development setup.
System Requirements
Dev Computer
Hardware
- PC running on Windows
Operating System
- Windows 11 (64-bit)
Software
- Apache NetBeans IDE 17
- Java Runtime Environment v17
- VSCode (1.78.2, latest should also work)
- Tera Term (v4.106, latest should also work)
901C Machine
Hardware
- 901C machine which contains a
R-Pi v3(32-bit) using a 32GB SD card. - Or if the code is being developed for
R-Pi v4, aR-Pi v4(64bit) board with 32GB SD card.
- 901C machine which contains a
Operating System
- R-Pi → Raspbian Version 9 (Stretch)
Software
- Apache NetBeans IDE 17
- Java Runtime Environment v17
- VSCode (1.78.2, latest should also work)
- Tera Term (v4.106, latest should also work)
Installation
NetBeans setup
This requires netbeans with C++ support plugin installed. Since newest Apache NetBeans release (version 17) didn't support the C++ plugin directly, some workaround were needed. Following notes are for Windows 11
- Installed the latest Netbeans (version 17) to default location.
- Installed latest JDK (version 17)
- Download JDK 13 binary files from https://jdk.java.net/java-se-ri/13 and extract the content.
- Search for
unpack200.exein the extracted JDK13 folder. (It should be located inside thebindirectory) - Copy the file to the
bindirectory in the install location of JDK latest version (version 17 for me. JDK was located inC:\ProgramFiles\Java\jdk-17\) (The need for this is found here) - Then install the
C++plugins for netbeans following the answer here
VSCode
VSCodeis used in-conjunction withNetBeansfor the code-development.
Tera Term
Tera Termis used to SSH into theR-Piof the901Cmachine to do terminal based operations.
Project Repositories
AgPoint-901C→ Code for theR-Pi 3Bv1.5_cleanup→ Cleaned up code containing the changes I made to the carousal logic built on top ofcode-from-Alancode-from-Alan→ Zipped code base received from Alan09132018→ Code with version tagv2.0found from the R-Pi image Alan sharedcode-from-pi→ Code found from the R-Pi image that seems to have generated the default binarycode-from-pi-v2→ Code with version tagv2.0from R-Pi image (not sure what is the difference between this and09132018)mdhippj_Ronc6F→ Code with origin 192.168.0.188 mdhippj Ronc6 from R-Pi imagemdhippj_Ronc6→ Code with origin Code from 192.168.0.188 mdhippj 'last one' from R-Pi image. Note that this has references to an older version of QT Interface Compiler, from v4.8.x to 4.6.main→ Not sure which version is considered asmainnow. This should be changed to reflectv1.5_cleanupafter reviewing.
AgPoint-901C-2023→ The updated code forR-Pi 4modified fromAgPoint-901C→code-from-Alan.main→ This branch contains the respective code.
AgPoint-Tasks→ A repo created to track the tasks related toAgPoint. No code is present.
Configuration
NetBeans
- Power on the
R-Pi(by powering on the901Cmachine) - Get the
R-Piconnected to the same network as of your machine.- If you are starting from a clean
R-Piinstallation, use the GUI to connect to the WiFi. - Or if you are using
901Cmachine directly, use the connect to network option available in the 901C application itself. Check the 901C manual for instructions.
- If you are starting from a clean
- Launch
NetBeans. Due to the workaround we used it will prompt the following message. ClickYes.
- Open the project from
Filemenu. - Goto
Run→Set Project Configuration→Customize.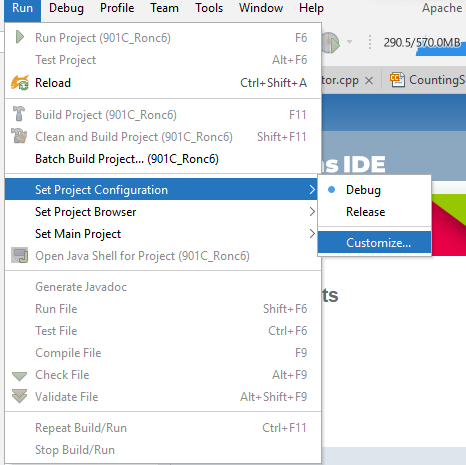
- Add the ip address of the
R-Piusing the following menu entries.- Goto the the
Addwindow.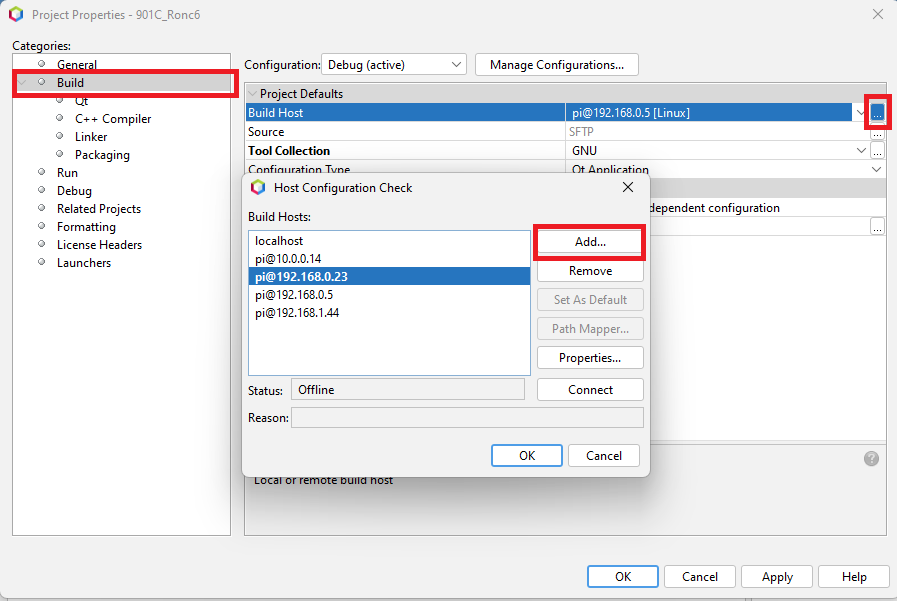
- Give the ip address of the R-Pi and click
Next
- Give the credentials to the
R-Pi, by default, username ispiand password israspberry. After setting up the credentials, clickNextand finallyOKon all windows.
- Goto the the
- Try
Buildcommand and if the configuration is done correctly,NetBeansshould connect to theR-Piand build the project there.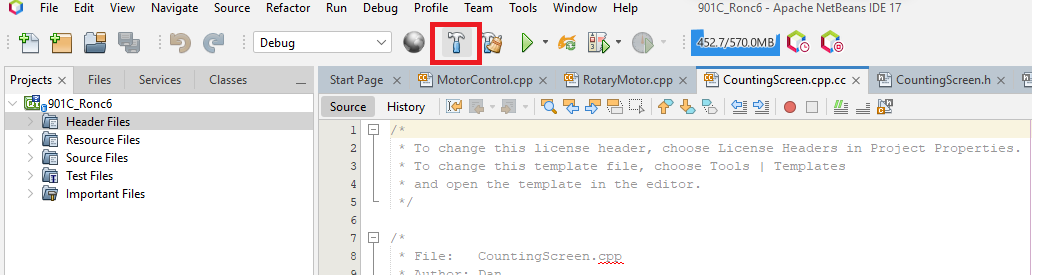
You should get an output like this: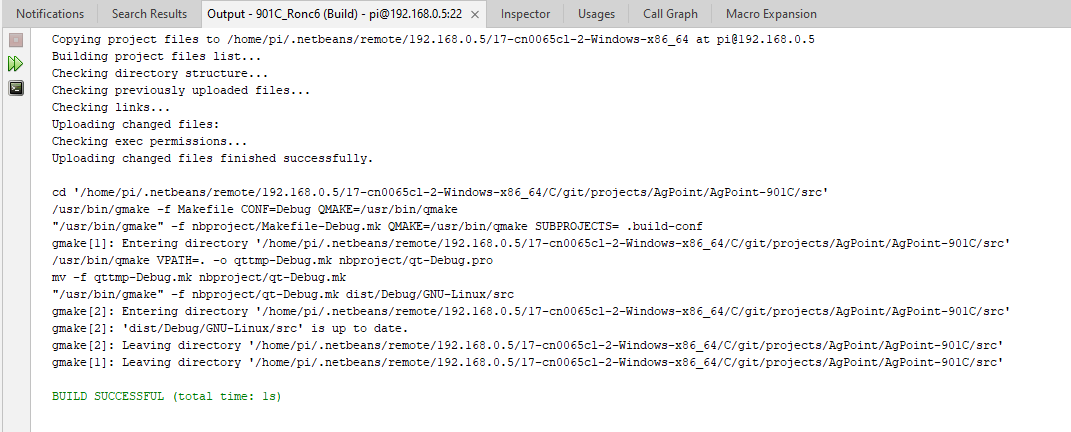
Shell scripts on R-Pi
I have created the following scripts in the R-Pi to help the deployment and testing.
Stop the current
901binary that is being run in the attached touchscreen to the901Cmachine. (~/stop_901C_and_refresh.sh)#!/bin/bash
( ps -e | grep 901 | cut -f 3 -d ' ' | xargs sudo kill ) &
( ps -e | grep 901 | cut -f 2 -d ' ' | xargs sudo kill ) &
sleep 10
cp .netbeans/remote/192.168.0.5/17-cn0065cl-2-Windows-x86_64/C/git/projects/AgPoint/AgPoint-901C/src/dist/Debug/GNU-Linux/src 901CnoteUpdate the first argument of the
cpcommand above to point to thesrcfile of your remote build directory.Script to launch the 901C binary and restart the
SSHservice in the background. This script is run from the touchscreen of the 901C machine itself. (~/start_901C.sh)#!/bin/bash
sudo /home/pi/901C
( sleep 60 ; sudo service ssh restart ) &
Development workflow for R-Pi 3B
The active branch for the latest code changes is AgPoint-901C → v1.5_cleanup
- Open the project through
NetBeansand get theR-Piup connected and setup for remote development with the instructions above. - Develop the code through
NetBeans(I also usedVSCodeat the same time for coding). - Build the source through
NetBeans. AsNetBeansis already configured for remote development, the binary will be generated in the R-Pi at/home/pi/.netbeans/remote/192.168.0.5/17-cn0065cl-2-Windows-x86_64/C/git/projects/AgPoint/AgPoint-901C/src/dist/Debug/GNU-Linux/srcwhere,192.168.0.5is the ip address of theR-Piin my local network17-cn0065cl-2-Windows-x86_64is the hostname of my Windows PC whereNetBeansreside./C/git/projects/AgPoint/AgPoint-901C/is the project directory in my Windows machine.
- Then using
Tera Term, SSH intoR-Piand run~/stop_901C_and_refresh.shto stop the currently running process and update the binary with the newly built one of which details are mentioned here. - From
R-Pitouchscreen run~/start_901C.shto run the new binary.
Code changes
- By 6/14/2023 the changes made to the code only focused on getting the chute alignment logic right. A preliminary logic was implemented and tested which we refer to as
chute alignment v1in related files. A test video can be found here.
Development for R-Pi 4 latest
Upgrading to latest Raspbian and installing project dependencies
In the R-Pi (Raspbian Bullseye 32bit with desktop):
Install
Qt5sudo apt-get install qtbase5-dev qtchooser
sudo apt-get install qt5-qmake qtbase5-dev-tools
sudo apt-get install qtcreator
sudo apt-get install qtdeclarative5-devFind details of transitioning from Qt4 to Qt5 here
Code changes:
// #include <qt4/QtCore/qstring.h>
#include <qt5/QtCore/qstring.h>

// All imports from QtGui should change to QtWidgets. e.g.
// #include <QtGui/qwidget.h>
#include <QtWidgets/qwidget.h>

// In Qt5, QApplication::UnicodeUTF8 is depricated. It is set to be the default
// All function calls containing QApplication::UnicodeUTF8 is changed as following example
// btnOK->setText(QApplication::translate("AboutScreen", "OK", 0, QApplication::UnicodeUTF8));
btnOK->setText(QApplication::translate("AboutScreen", "OK", 0));

// Qt4 to Qt5 change -> QHeaderView changes
// widget.tableWidget->horizontalHeader()->setResizeMode(QHeaderView::Stretch);
widget.tableWidget->horizontalHeader()->setSectionResizeMode(QHeaderView::Stretch);

// Following threw compiler errors. Hence had to be commented out. Need to find the cause
//    connect(widget.btn .btnCounterSetup, SIGNAL(pressed()), this, SLOT(DisplayCounterSetup()));//added0220

//    widget.btnCounterSetup->setStyleSheet("background-color:white;");// added0220
//    widget.btnCounterSetup->setText("Counter\nSETUP");// added0220
Qt version:
Qt version 5.15.2 in /usr/lib/arm-linux-gnueabihfInstalling MYSQL
-lmysqlclientis removed from the linker as I couldn't install the library in Raspbian. Instead the corresponding library for mariadb is linked.
This needs to be changed from mysql to mariadb as MYSQL no longer support raspbian
sudo apt install mariadb-server
sudo apt install libmariadb-dev
sudo apt install libmysqlcppconn-dev
// #include </usr/include/mysql/mysql.h>
#include </usr/include/mariadb/mysql.h>Installed version :
mariadb Ver 15.1 Distrib 10.5.15-MariaDB, for debian-linux-gnueabihf (armv8l) using EditLine wrapperWiringPi
The official support for the
WirePilibrary has stopped. Installed it through an active fork.cd git/public
git clone https://github.com/WiringPi/WiringPi.git
cd WiringPi
./buildWireless library
sudo apt-get install libiw-dev
Errors
While running the program in R-Pi v4
